


Single Sign-On (SSO) is one of the key concept that allows you to login to one system and you can access multiple systems in the backend. SSO allows the user to access software resources across SAP systems in the back-end.
The SSO with NetWeaver platform provides user authentication and helps system administrators to manage the user loads in a complex SAP System Landscape. SSO configuration simplifies the process of how a user logs into the SAP systems and applications in landscape by enhancing the security measures and reduces the password management tasks for multiple systems.
SSO helps an organization to reduce their operation cost by decreasing the number of calls to the Service Desk related to password issues and hence increase the productivity of the business users. SAP NetWeaver integration mechanism allows you to easily integrate your SAP NetWeaver system in the SSO concept and provides easy access to backend systems in SAP System Landscape Environment.
SAP Single Sign-On Concept
The Single Sign-On can be configured with mySAP Workplace which allows a user to login to mySAP Workplace daily and they can access the applications without repeatedly entering their username and password.
You can configure SSO with mySAP Workplace using the following authentication methods −
- Username and password
- SAP Logon Tickets
- X.509 client Certificates
Integration in Single Sign-On
The SSO with NetWeaver platform provides user authentication and helps system administrators to manage the user loads in a complex SAP system landscape. SSO configuration simplifies the process how user login to SAP systems and applications in landscape by enhancing the security measures and reduces the password management tasks for multiple systems.
Using SAP NetWeaver allows you to configure different mechanisms that authorized users use to access the NetWeaver System using the SSO method. The login mechanism in system depends on the technology of SAP NetWeaver system and different communication channels used for accessing those systems.
Configuring Single Sign-On in a SAP GUI
To configure a Single Sign-On, you need to have access to the following T-codes −
- RZ10
- STRUST
Once you have these T-codes, you should follow the steps given below −
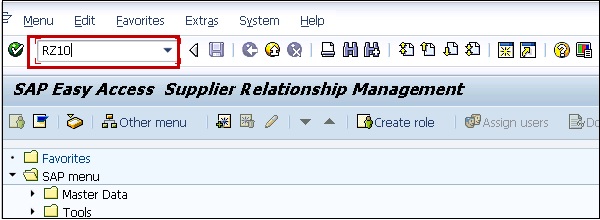
Step 1 − Login to any SAP ECC System using the SAP GUI, go to T-code RZ10.
Step 2 − Select the Default profile and Extended Maintenance after that.
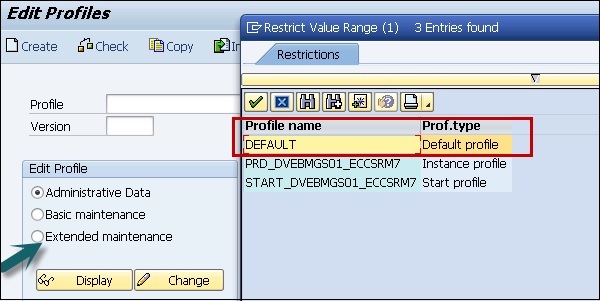
Step 3 − Click on Change and you will see the list of parameters for the profile.
Step 4 − Change the following profile parameters −
- login/create_sso2_ticket = 1
- login/accept_sso2_ticket = 1
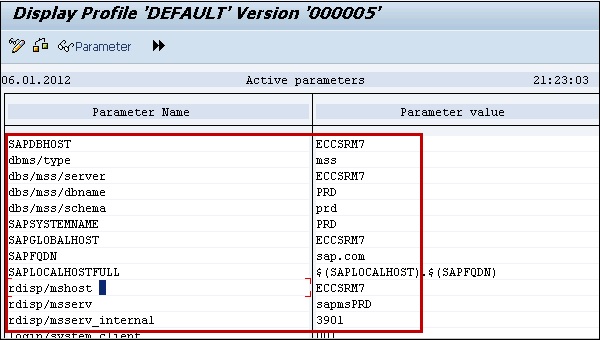
Step 5 − Save and Activate the profile. It will generate a new profile.
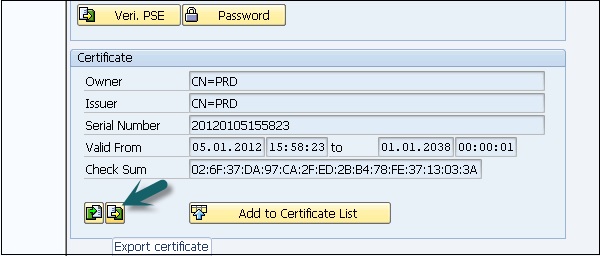
Step 6 − Export the R3SSO certificate from the Trust Manager, go to transaction STRUST.
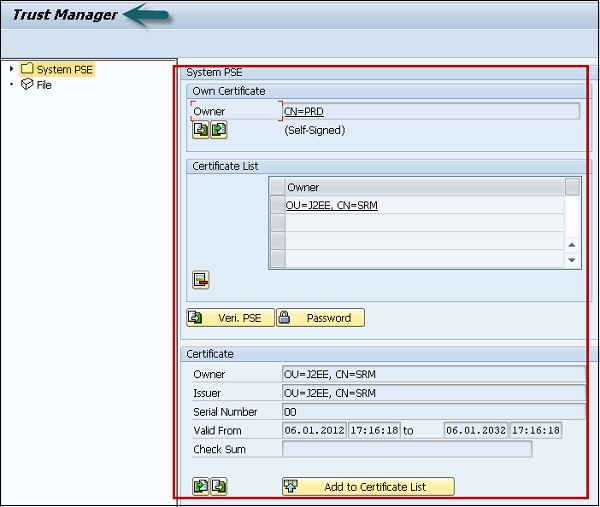
Step 7 − Double-click the text box to the right of Own Certificate. The certificate information is displayed. Note down the values of this certificate as you need to enter the values.
Step 8 − Click on Icon Export Certificate.
Step 9 − Save the file as <R3_Name>-<Client>.crt.
Example − EBS-300.crt
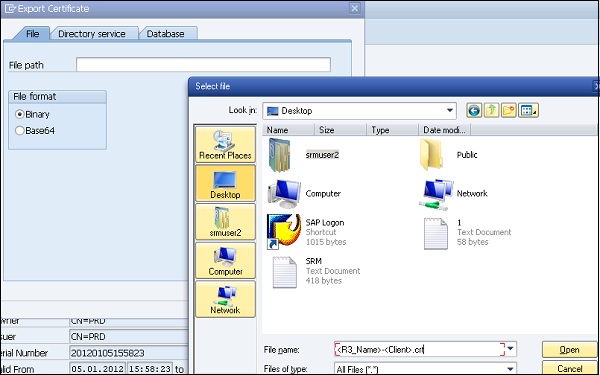
Step 10 − Click on the tick box to create the file in the parent directory.
Step 11 − Import R3 SSO certificate to the Java engine using the administrator tool.
Note − Make sure the Java engine is started.
Step 12 − Open the Java Administration tool.
Step 13 − Enter the Java Engine Administrator password and click on Connect.
Step 14 − Choose Server → Services Key → Storage.
Step 15 − Click on the Ticket Key Store in the View panel.
Step 16 − Click on Load in the Entry group box. Select the .crt file you exported in the previous step.
Step 17 − Configure the Security Provider service in the SAP Java engine using the Administrator tool.
Step 18 − Choose Server Services Security Provider.
Step 19 − Choose ticket in the Component panel and go to the Authentication tab.
Step 20 − Modify the options of Evaluate Ticket Login Module and add the following properties to each backend system on which you want to configure SSO.
Single Sign-On for Web-Based Access
You can configure several options with SSO to access SAP NetWeaver system. You can also access SAP NetWeaver System via a web browser or from some other web client. Using SSO, users can access backend systems and other secured information located in the company network.
SSO allows you to use several security authentication methods for integrating web based user access on NetWeaver Application servers. You can also implement various network communication security methods like Cryptography to send the information over network.
The Following authentication methods can be configured with SSO to access data over Application servers −
- Using User ID and Password Authentication
- Using Logon Tickets
- Using X.509 Client Certificates
- Using SAML Browser Artifacts
- Using SAML 2.0
- Using Kerberos Authentication
While accessing data over the internet, you can also use the security mechanism in the Network and Transport Layer.


