Showing posts with label SOLMAN. Show all posts
     In SAP Solution Manager, there is functionality called MOPZ (maintenance optimizer). So, what is MOPZ?

          The Maintenance Optimizer leads you through the planning, download and implementation of
support package stacks, which contain a set of support packages for your systems. You can also install enhancement packages or put them into an upgrade to SAP ERP 6.0 (previously SAP ERP 2005), using the Maintenance Optimizer. 
The Maintenance Optimizer gives you an overview of all maintenance activities in your system landscape.

Prerequisites

You must have configured the MOPZ in the SAP Solution Manager and make sure your user is authorized to access the function.

Steps

This information was tested in SAP Solution Manager 7.1 support package stack 4. Some functionality may be different on other support package stack.

1. In the SAP Solution Manager, execute transaction code SOLMAN_WORKCENTER. Go to Change Management tab and from the left panel, click on New Maintenance Transaction.


2. A new screen will prompt. You need to enter the Solution, Product Version and Product System from the list. Click Continue.


3. Choose to Calculate Files Automatically. The MOPZ will check your system landscape, calculate all the needed files and confirm them in download basket.


4.  Select the Update Options.Depending on your requirements, if you are going for support packages upgrade choose Maintenance. Else, for EHP upgrade, choose Enhancement Package Installation. In this example, we are going to choose Enhancement Package Installation.


5.  Select the target for enhancement package product version and stack. In our case, the system is installed with SAP ERP 6.0 EHP6. We want to upgrade to SAP ERP 6.0 EHP6 with the latest support
packages stack 18.


6. Confirm the target of your SAP system. Click on Continue.


7.  Select any add on products if applicable. Else, click Continue to the next stage.


8.  Select the OS/DB Dependent files.


Expand the file name to see the OS/DB dependent selection.


Expand database based on your custom requirement.


9.  Select the Stack Independent Files.


10.  Select Stack Dependent Files. Please noted that it is not recommended to deselect any files. Click
Continue.


Select the components based on your requirements.


11.  Select Download  Tool. Click Continue.


Click on continue to add all this packages to Download Basket.

12. The selected files have confirmed automatically – means that you do not need to confirm them separately. To begin the download, push the button as in the below screenshot. The downloads will starts afterwards. Click Continue.


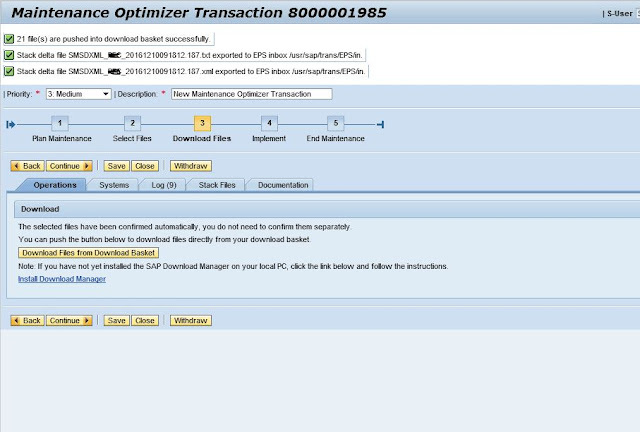
13.  The next page will shows the status of the implementation. You can only continue when the status of all listed product system is Completed. Press Save to store the MOPZ. No more action required –You may need to implement the upgrade and wait till the process is finished.


Stack file can be downloaded manually in "Stack Files" tab in the above screen.


Note:

You can always display all the previous MOPZ from the transaction code SOLMAN_WORKCENTER. Then, go to Change Management tab and click on Maintenance

Optimizer. All  the MOPZ lists will appears.


 How to configure Early Watch Alert report


To configure Early watch alert some specific settings to be done at managing system (Solution manager system) and satellite system( or managed system – for which EWA report to be generated)
Following are the steps to configure EWA in a satellite system :

1) Check whether latest versions of ST-A, ST-PI, ST-A/PI packages are installed in the managed/satellite system
(This check can be done going to system->status -> Component information display in any sap screen)

2) If they are installed, run RTCCTOOL report from SE38 transaction code of satellite system.

Check the output of the report. If there are some errors or warnings in the output of the report, please take corrective actions and run the report again and ensure there are no errors

3) Setup RFC connection between your satellite system and the solution manager system
An RFC connection can be made between 2 systems using Transaction code SM59
4) Setup RFC connection between your solution manager and the SAP service market place

5) Assign the solution monitoring roles to the users

6) Setup your satellite system in a solution landscape of the solution manager(SMSY)

7) Make sure SLD is configured and working fine for satellite system (using Rz70 and SLDCHECK transactions)

8) Activation of SDCCN in satellite system (Goto SDCCN transaction. Then click on Utilities -> Activate)  then confirm for SDCC_OSS destination creation

9) In satellite system, goto SDCCN transaction and navigate to Goto -> Settings -> Task specific.
In the resulted screen, select RFC destination and provide the solution manager RFC from the satellite system and set solution manager RFC as the master system.

10) Addition of satellite system in solution manager system in SDCCN :

Goto SMSY transaction in solman system and then navigate to Environment -> Solution Manager Operations -> Adminstration SDCCN to add the new service data control centre to the solution manager.

Click on add system button to add the new SDCC to the solution manager. When prompted, please select the respective system and client from the resulting screen and confirm

11) Early watch service session activation for satellite system:

In the solution manager system, execute transaction code solution_manager  and navigate to operations -> Earlywatch Alert and press create button. This prompts you to confirm the date and time to run the report. Please provide the details and confirm to trigger the generation of the report

12) Login to satellite system, goto transaction code SDCCN and press create button which displays a screen to select a task to be executed. Select request session data task  and click continue. You will be prompted to enter the schedule time to run the report. Click now to execute it immediately. After that you can see an early watch session running in SDCCN.

13) After completion of this session run successfully, an Earlywatch Alert will be generated and this can be viewed in Solution_manager of Solution manager system.

Solution Manager EarlyWatch Alert Setup for ABAP Systems

EarlyWatch Alert generation is a service provided by the SAP Solution Manager that provides technical insight in the operation of SAP systems. It uses general recommendations and KPI from SAP to determine the health of the SAP system. Focus is mostly on measuring the capacity of the system and showing possible issues that might jeopardize operation in the future.

EarlyWatch Alert generation has to be configured before related functionality such as Service Level Reporting can be used. This document describes the configuration of EarlyWatch Alerts for ABAP systems only.

Pre-requisites

To perform the steps as indicated in this document, the following pre-requisites have to be fulfilled.

• Solution Manager 4 basic configuration has been performed (see reference IMG)

• The system for which the EarlyWatch Alert are to be generated it connected to the Solution Manager as per my previous blog posting ‘Attach SAP System to Solution Manager’( http://sapbasistechnical.blogspot.in/2012/05/sap-basis-technical-attach-sap-system.html )

• On the system for which EarlyWatch Alert generation is to be configured, the latest ST-PI and ST- A/PI have to be installed

• Service connection from the system for which EarlyWatch Alert is to be created to SAP has to be configured (i.e. transaction OSS1 has to be configured).

Choose the ‘Call Service Data Control Center’ button. This logs on to the remote system and launches transaction SDCCN there


Choose Yes’.
Choose Yes’.
The settings for the preparation tool are shown


The default values are fine. Choose ‘Save’.
Note: all items should be green. Note 69455 might be red, but that is easily fixed. Choose the button


‘Addons & Upgr’


Choose ‘Procedure after addon implementation’ 


Now the ‘After impl’ is green too. Choose ‘OK’ to continue.

Now, all items should be green. If it does, leave the screen and choose ‘Yes’ on the following pop-up


Schedule regular retrieval of sessions


The system for which Early Watch Alert reports should be created, will have to check at the Solution Manager for new reports to generate daily. For this, a task will be scheduled. From the menu choose ‘Task’ --> ‘Create’.

From the menu choose ‘Task’ --> ‘Create’
Double-click ‘Refresh sessions’.
Choose the RFC connection to the Solution Manager as the ‘Target RFC Destination’. Also, click the


‘Run Task Periodically’ button. This will make the task run daily. If no RFC destination to the Solution Manager is shown, proceed as shown in the appendix in sections 3.3. Note: you can choose any start time.

In principle, the configuration of Early Watch Alert reports is now done. However, it is wise to try and generate a report manually at this time.

Manually create an EarlyWatch Alert report

Log on to the Solution Manager and call transaction SOLUTION_MANAGER. Choose the landscape containing the system for which EWA needs to be created. Go to ‘Operations’  ‘Solution Monitoring’ ‘Early Watch Alert’.

Choose ‘Create Service’.
Choose the system the system for which the EWA needs to be created. Choose ‘Create’.


Choose ‘Task’  ‘Create’


Double-click‘Refresh sessions’
 
Choose to schedule ‘Now’. Also, choose the RFC connection to the Solution Manager system as the


Target RFC destination. Choose ‘Continue’

That’s nice. Now, choose ‘Continue’.

The task is scheduled to start. Choose ‘Refresh’ to update the status. Once it is done, automatically EWA entries are created.

Start EWA data collection manually
The new EWA is added to the task list. Click the SAP Early Watch Alert link.
Choose the ‘Call Service Data Control Center’ button. This logs on to the remote system and launches transaction SDCCN there

Refresh sessions

Start EWA data collection manually

These services will run periodically. However, to check the creation of EWA, creation of an EWA will be triggered immediately. Choose the first row with an EarlyWatch Alert task. Then choose ‘Edit’ ‘Start now’

Appendix: add the Solution Manager RFC to the SDCCN


From transaction SDCCN, choose ‘Goto’ --> ‘Settings’ --> ‘Task-Specific’

Click on the table button in the ‘RFC Destinations’ section.
No RFC destinations are shown. Go to change mode and click the ‘Add RFC destination’ button.

Give the RFC destination a name and choose the RFC connection to the Solution Manager.

The RFC destination is now shown in the list. Now, set it as the master system, so it will be default for all manually created sessions. Click the ‘Set Master SAP Solution Manager system’ button.


Choose the RFC connection to Solution Manager as the Destination.


The Solution Manager can now be accessed from SDCCN. Click OK to continue.

Optional: Automatic sending of reports by e- mail

Prerequisite


The task has started execution. Note it might run for 30-60 minutes!

When it is done, it will be removed from the ‘To do’ tab. Choose ‘Back’ to leave the satellite system. Choose ‘Back’ again to see the list of EWA services in the Solution Manager


Start processing of received data manually


In the overview of EWA tasks, a new entry is created. This entry means that data has been received from the system and is ready to be processed. Click this entry

The processing of the received data will also start automatically at some point in time. But for testing purposes, the processing will be triggered manually. Choose ‘Start service processing’.


Choose ‘OK’ to continue.


The processing will run for some time. When it is done, the icon before the Early Watch Alert will change to a value indicating it’s status. The yellow icon means that issues were found in the EWA. Choose the Word icon to view the EWA.
Copyright © 2013 VENKAT SAP BASIS